Showing posts with label technology. Show all posts

Tuesday, January 1, 2013

Lesson Idea: Alcohol Stories (Using Web 2.0)

I'm always looking for ways to bring class content and skills alive in my health classroom. I first heard of this lesson from one of my undergraduate professors, Dr. Shannon Whalen, who shared it during a methods class during my junior year. The lesson initially appeared in the American Journal of Health Education in their July/August issue from 2007 (in an article written by Dr. Whalen with Suanne Maurer-Starks), and if you have access to a research database it's pretty easy to find the article. If you're an AAHPERD member and subscribe to the American Journal of Health Education, you can log on to the AAHPERD website and read the article for free.

I will not go into detail about discussion questions or the way in which Dr. Whalen completed this assignment. For that, you will have to find the article I mentioned above. The basic premise of the activity is for students to share stories relating to alcohol and how it had affected their life, specifically the consequences of binge drinking. The story just needs to be true and something that happened to the student or someone they know. Dr. Whalen would have college students submit their responses with a cover page, which was then torn off and counted for credit. The stories are shuffled and students take one randomly.

A screenshot of instructions on the Google Form 

Well, middle school students generally don't have the alcohol experience that college students have. I liked the idea of the lesson and wanted to adapt it to use in my middle school classroom, with the hope of injecting a little dose of reality into our alcohol unit. So, I reached out via social media to see how people I connect with online could help me out.  First, I created a simple Google Form for people to fill out anonymously. I shared this link via my personal Facebook and Twitter accounts, where I mentioned that I was looking for anonymous stories relating to alcohol use or abuse. There was no way for personally identifiable information to be included unless the person decided to write it in their story (no one did). I received twenty three responses; I am not sure who responded although some people did comment that they filled out a response. I did take out one that I felt was not appropriate to share with middle school age students. I did this over two separate occasions: May 2011 and January 2012. If I were to do it again, I would be more specific about using different hashtags on Twitter; I probably would not put it on Facebook again. With Twitter, I have never met most of my followers in person and I think the anonymity makes it easier for people to decide to write a story.

I simply have to print out the stories to share with my students. I cut them up into strips of paper and place them into a box/bag, and we create a circle of chairs around the room. We go around the circle and students pick a random story from the box/bag and read them aloud. At this point in the unit students already have basic knowledge of alcohol, and some of them point that out as we go through certain stories. I will briefly summarize certain aspects of each story as we go through them, but generally I save the discussion for the end; I make notes as we go through the activity so I remember to highlight certain points.

Below is a screencast showing the Google Form I created, as well as a brief scan through all of the responses I received. If you would like to fill out the form to contribute to how I use this lesson in my classroom, please click this link. This activity is adaptable to a variety of content areas, including other ATOD topics but also bullying. I would caution having current students completing this type of activity only because there might be legal ramifications as well as varying comfort levels to address.


As always, please feel free to e-mail me with questions, comments, or concerns.


Wednesday, December 19, 2012

Web 2.0 Tools: Wallwisher

When I start new units I like to use different types of activators to help determine what students know and get their brains firing about the topic we'll be covering over the next number of classes. I have a couple different types in rotation, depending on content and grade level, and I am always looking for different activators to try out or ways to improve on what I do.

In this situation, I wanted to see what students could come up with relating to the causes of the obesity epidemic in the United States. Because my students sit in groups, the prompt was easy enough: "In your groups, brainstorm as many causes of the obesity epidemic that you can think of." I usually post some guiding questions to help stimulate discussion, and I tried to get students thinking with these: "How did we get to this point? What factors have changed from years ago? Think small scale and large scale." We would go over the responses, start a discussion, and then shift to the notes they had to take down that day. Yes, sometimes my students have to take notes.

Normally, students would have regular lined paper, a larger piece of chart paper, or some of the whiteboards that I'll use for activators or other brainstorms. I've also considered using sticky notes, with one idea per note, and having students plaster them over the white board. This isn't really cost effective and there was not a way to easily save the work to re-examine it at the end of a unit.

But last week, I just happened to have the laptop carts in my room for my seventh grade "Tobacco Prevention Experts" projects. We were able to get about 9-10 of the 15 in the cart to work (an excellent rate, believe it or not) and they were just sitting there during my eighth grade classes. I also just happened to have taken a class in teaching using Web 2.0 and other technology tools. It was the perfect opportunity to try out Wallwisher, so when planning for this lesson I mad sure to incorporate this tool.

Wallwisher is simply described as, "Paper for the web." Wallwisher can be used for many different reasons; in response to the question, "What can you DO with Wallwisher?" the site provides many options: make noticeboards, teach, discuss, brainstorm, plan events, learn, and make lists. As I stated above, I used it for brainstorming.

A user logs on and creates a wall, which is customizable with different backgrounds. A wall creator can even create their own URL for the wall they create; I simply linked the walls from my class website and did not use this feature. Students then access the wall where they can post their own thoughts. All they have to do is double click, enter their name, and type their text. Students can also post links to websites, pictures, videos, and other media forms. Students can take to the Internet in search of items they could contribute to the wall. So, I had students log on (we had to share laptops, but students are used to this and did fine sharing) and begin posting away. I did have to delete a few silly posts, but for the most part students were engaged in what they were doing. I was able to give comments as posts happened, and students would respond.  As the creator of the wall, I was able to move the responses around in real time, and the students could not. This allowed me to be by the computer or Smartboard and create categories as they were created. If a teacher has a tablet, it would be even easier to create categories on the go!

An options exists if you wish to moderate posts by having to approve them before they post. I did not feel the need to use the option and feel like it would detract from the feel of using Wallwisher, and my students are pretty good about following technology protocols. It is easy to control how long you want the wall to remain open for students to write on by switching the "Who Can Write" option to "Only Me." Users can even subscribe the a wall's RSS feed. I had two students grab their iPhones and post to Wallwisher from their mobile browsers. Both had no issues and reported a positive experience.

I've embedded an example from one of my classes below. If you scroll around, you will seen numerous posts with images or pictures, as well as links to websites. This is what the product looks like after I arranged posts into a few rough categories. Scroll down for some final thoughts on Wallwisher.


Students covered a lot about fast food, but also hit upon points like stress eating and the availability of healthy foods. By clicking on each post, it is made bigger for easy viewing and whatever content is posted there fills up the page. You can scroll through each post this way, and you can also share posts via Facebook, Twitter, and other social media sites.

I enjoyed using Wallwisher because students were able to complete the same objective that they normally would if I used the "old school" brainstorming methods, but they were able to take it further and further, as deeply in the content as they want to go. After we were done, we had a conversation that segued nicely into our lesson. Because this was the start of a unit, I did allow about half of the class period for this activity.

As much as I enjoyed using Wallwisher, using it or similar brainstorming tools again would be very easy to use all the time if my district allowed students to bring their own web-enabled devices to school OR if we had access to reliable technology for students to use. Where I teach, enough students have smartphones or even laptops to make this a reality; any students who do not have access to a device could share with those who bring them in. I'm going to get off my soapbox now, but these are just points to mention the difficulties many teachers may face in implementing Web 2.0 tools in their classrooms.

As always, please do not hesitate to contact me with any questions, comments, or concerns.

Additional Resources: For more information on Wallwisher, check out the following resources:
  1. Check out Wallwisher
  2. Using Wall Wisher in the Classroom by Richard Byrne at Free Technology for Teachers
  3. Follow Wallwisher on Twitter

Saturday, December 1, 2012

"I Can't Breathe" Pam Laffin Video: Streaming on Vimeo

During my later elementary school and early middle school years, I remember seeing many anti-smoking advertisements sponsored by the Massachusetts Department of Public Health. The advertisements that I remember the most focused on a local woman named Pam Laffin. Pam was in her late twenties and suffered from emphysema. The advertisements were more graphic in nature than other advertisements I had seen, and I'm sure the DPH wanted to hit viewers with emotional advertisements.

If you know me as a teacher or have seen some past posts of mine, you know that I am not a fan of showing videos in a health education classrooms. I feel that videos are too often used as a cop-out by teachers who have no health education experience, or that they are not used appropriately. I do use a handful of video clips in class, but I only show two or three videos that could be considered somewhere close to a full length class period. Videos CAN be used appropriately, and the students sometimes enjoy them, but as I am shifting to a more skills-based classroom I don't see the need. Plus, it's not as fun as actual teaching!

One of the videos that I do show is an MTV True Life Episode entitled, "I Can't Breathe." "I Can't Breathe" was produced by MTV with assistance from the Massachusetts Department of Public Health, and documents Pam Laffin's experience with cigarette smoking and the negative health effects (cumulating with emphysema and a failed lung transplant) she dealt with. The video is short and to the point, and I use it to tie together the previous lessons we dealing with tobacco: smoking's effects on the body and the straw walk. The video is only twenty minutes long, but by using my go-to video viewing protocol (Record, Elaborate, Extend) as well as answering the numerous student questions that come up, this takes the full 53 minute class period.

I will say that some students will find this video a little graphic. They compare a healthy lung to a smoker's lung on an autopsy table, and the lungs are cut into to be examined. There are also some clips of Pam's lung transplant surgery. I know where these points are and give the students warning before they come up. 

You can stream "I Can't Breathe" directly from Vimeo. My district blocks YouTube and for some reason Vimeo is not blocked. Please note that I am not sure how that video is posted there or the copyright laws it may be violating. All I know is that this video has been effective in my classroom and you may find it effective in yours.

Here is a link to "I Can't Breathe" on Vimeo. Here is another link to the video viewing protocol I use for the few videos I do show.

Please do not hesitate to contact me with any questions, comments, or concerns.


Wednesday, May 23, 2012

Melanoma Resources, Part Two: Melanoma Education Foundation

Melanoma is an important topic to discuss with children and adolescents. Over the next few blog posts, I will be posting about different melanoma resources I've used in my middle school classroom. When detected early, the survival rates of melanoma are quite high; when not detected early melanoma can become deadly. Many teenagers are not aware of the dangers of melanoma!

The Melanoma Education Foundation is a local nonprofit organization here in Massachusetts "devoted to saving lives from melanoma." The M.E.F. provides classroom materials to teachers, maintains an easy to navigate website that is loaded with information, and also conducts speaking engagements for local businesses.  The M.E.F. has helped provide resources to schools all across the country in all fifty states, and is a must-see resource for any health educator.
One benefit of the information provided by the M.E.F. is that it can be taught in one or two classes (depending on how long the classes at your school are), and therefore can be implemented as needed into any health education curriculum. Focusing in early detection and prevention, the classroom materials involve many formats: class discussion, brief videos, Power Point presentations, take home quizzes, etc. The bookmarks are quick and helpful resources, and if you don't use them (contact the M.E.F. and they will send you some) a bookmark is a great project idea for the students. 
The M.E.F. website also serves as a nice introduction to those who may not be familiar with melanoma, and it could even be used as a web quest. I'm a big fan of the graphics on the M.E.F. website, and have used them to supplement my own lessons on melanoma in eighth grade health education. The animation on mole "evolution" (scroll down here) has been helpful for students to realize that the mole is growing deeper into the skin in addition to the visible growth.
The Melanoma Education Foundation is doing a fantastic job in accomplishing its mission statements. You may visit their online store to scan some of their products, although we have received free bookmarks in the mail from them in the past. In working towards their goal of "saving lives through education," the Melanoma Education Foundation helps fill a vital knowledge gap in the lives of teenagers all across the country.

NOTE: I am in no way affiliated with the Melanoma Education Foundation, although I do use some of their resources in my classroom.

Wednesday, May 16, 2012

Melanoma Resources, Part One: Mollie's Fund App

Melanoma is an important topic to discuss with children and adolescents. Over the next week, I will be posting about different melanoma resources I've used in my middle school classroom. When detected early, the survival rates of melanoma are quite high; when not detected early melanoma can become deadly. The first post deals with a new phone app relating to melanoma; next time check back for a local Massachusetts organization relating to melanoma. Other topics include curriculum resources and lessons developed by Mollie's Fund and a third organization, too.


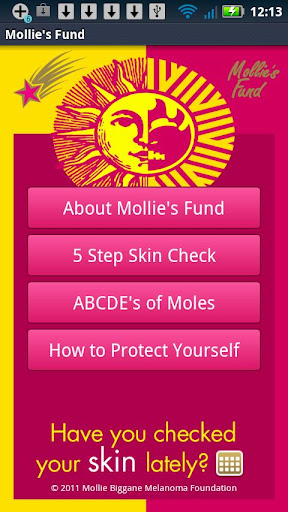
Teenagers live in a world of technology, surrounded by apps designed for seemingly any task. Many apps have been created relating to nutrition, fitness, and other health topics. Mollie's Fund has recently developed an app designed for self skin checking for melanoma, a simple procedure that can help save lives. "Have You Checked Your Skin Lately?" (labeled "Mollie's Fund" on my phone) is available for the iPhone, iPad, iPod Touch, and Android, and is one app that I will be telling my students about.

From the Google Play Store
I downloaded the app on my Droid Incredible and gave it a whirl this week. It is nicely designed and easy to navigate; it is void of advertisements and has a nice layout. I don't like apps that waste space with advertisements or unnecessary features, so I like the simplicity of this app. The app's homepage has buttons linking to four separate sections of information: About Mollie's Fund, 5 Step Skin Check, ABCDE's of Moles, and How to Protect Yourself. There is also a skin-check calendar discussed below.

Mollie's Fund provides some basic information about their organization within the app, and an option entitled, "5 Step Skin Check" walks you step-by-step through a five-step process used to detect moles on your body. Pictures are included with each set of instructions, and it's easy to swipe through the steps, which are broken down so that they are easy to follow.

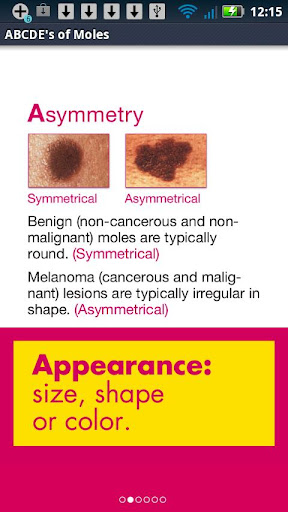
The "ABCDE's of Moles" is a nice little resource that can help users differentiate between benign moles and melanoma lesions. Pictures are provided showing both benign and melanoma lesions, and definitions are paraphrased in one word summaries, too. "How to Protect Yourself" highlights six ways you can protect yourself from the sun. Although they seem like common sense, I know that many teenagers (and a lot of adults!) don't practice these simple (yet effective) ways to help prevent skin damage from the sun. The app provides a skin check calendar with twelve squares, one for each month of the year. Users simply check off each month as they complete a skin check. Users can even check an option for a skin check reminder; although I have only had the app a few days I can assume that it will remind the user once a month to perform a skin check.

From the Google Play Store
Recommendations
All in all, I think this app is great, and I like that it's basic with less clutter than other apps. With that being said, I think a few minor adjustments could enhance the app for all users. In the past, I have handed out a mole map to students during our melanoma unit. The mole map allows individuals to keep track of any moles or other changes to their skin that they may find, which makes it easier to detect any changes that may occur. If I were the app developer, I might also make another button with the skin check calendar, instead of having it at the bottom as it is now. Despite these recommendations, this is a great app and one that is fulfilling a definite need in relation to health education. I can easily point my students in the direction of this app so they may continue to apply skills that they have learned in health class. Technology continues to allow students to connect what they learn in school to their real lives.

A skin check is a simple tool that can save lives. Apps like the one created by Mollie's Fund provide users with a quick, simple, and effective way to check their skin and keep track of their skin checks. It's definitely worth a download!

Download "Have You Checked Your Skin Lately? (Mollie's App)"
Google Play (formerly the Android Market)
iTunes Store


NOTE: I am in no way affiliated with Mollie's Fund; I simply came across a copy of their "The Dark Side of The Sun" DVD in college and have occasionally used it during our own melanoma units.

Wednesday, April 4, 2012

Puberty Resources, Part Two: "Being Girl"

Being a twenty-five year old male teacher who has to teach twelve year old girls about the menstrual cycle can be pretty awkward. It's not that awkward for me, but it definitely is for the kids. Let's face it, puberty is not the topic most sixth graders want to learn about.

But sometimes, students break through the awkwardness and actually approach me to discuss something related to puberty. Before we get into that, some background:

The way our curriculum works, I teach both boys and girls about puberty in a co-ed sixth grade classroom. Sometimes there is an aide (typically female) in the room with me if assigned to a student. That can make things more awkward...and then there was that time I accidentally left a copy of the male reproductive system diagram in the teacher's room during a lunch period...now THAT was awkward for my colleagues; I thought it was kind of funny.

Being Girl website
The other health teacher I work with is male, and there are times when I really feel for the girls. It's awkward enough to learn about puberty (despite creating what I think is a comfortable learning environment), but I am sure that to be an adolescent girl learning from a male teacher can be pretty embarrassing. Right now, I'm lucky to have a female student teacher, and we added a class to the unit where she took the girls to another classroom to have some discussions specific to being a teenage girl during puberty; this was in addition to the co-ed lessons I normally teach.

So, back to my story. After one class on puberty, one of my sixth grade girls came up to me quietly. She was pretty confident and nonchalantly started talking to me.  "Mr. Bartlett," she began, "Have you ever heard of 'Being Girl?' You should check out their website." She then turned on her heels and scurried out of the classroom, probably wanting to avoid any more puberty discussion with her male health teacher. I had a prep the next period, and typed "Being Girl" into Google.

I felt like I hit a gold mine.

Being Girl is a great resource for teenage girls about all the changes going on in their bodies during puberty, in addition to many other topics. It's flashy, it has "cute" colors typically enjoyed by adolescent girls, and it's interactive. It's an even better source for male health teachers to find information that speaks "teenage girl." I'm a big believer that if I cannot answer a question (either because I don't know the answer or, more often, because district policies say I can't) that I provide students with appropriate resources where they can get an accurate answer. Being Girl is one such place. They have a YouTube channel as well. I've looked at two or three videos on their channel and I do have to admit, they're well done (despite the marketing slant towards Always products).

Definitely check out Being Girl and pass it along!

Note that the website is run by The Procter & Gamble Company, makers of the Always brand of feminine hygiene products. So, there's some advertising and I wouldn't be surprised if readers could tell some of the content is written with a bias. Pick your battles.

NOTE: I am not affiliated with Proctor & Gamble or any of their products. These words are my own and not endorsed by them.

Saturday, December 17, 2011

Puberty Education Resources: Part 1

It's been a while since I've posted any sort of information relating to what I've done in my classroom. There's really no reason, but between teaching, head-coaching a team of 75 kids this fall, and grad-school, things get pretty busy. With that being said, I ran into some grad school classmates of mine who are student teaching and we were exchanging teaching ideas, which lead to my thinking about posting again. Combine that with my PLN on Twitter, and there's a whole-lotta information being exchanged that I want to get in on once again. I'm still getting hits every week from Google, so it's time to shake of the cobwebs and get back into blogging.


Given that I have just taught puberty to the sixth graders this year, I figured I would post some of my favorite resources for puberty education that I use in my classroom.


NOTE: I have posted about some of these before. Links to old posts are provided, but when I have changed things I've made notes in this post.


PBS Kids: It's My Life: "Puberty: Whole Lotta Changin' Goin' On"
PBS Kids is one of my favorite resources to use in the classroom. When I started teaching, I found it difficult to break down certain body processes (nocturnal emissions, menstruation, etc.) down into language that sixth grade students would understand. Looking back on it, it's not too difficult to do; I was still in the college mindset my first year and now I have no problem doing so. By the name, you may have surmised that PBS Kids is written for kids. The information about puberty is part of a larger PBS Kids website called, "It's My Life." It's my life contains information for kids on topics such as puberty, depression, staying home alone, school, family, and emotions. The website is very content rich and contains numerous videos, games, and interactive activities. Off-line activities are also available on the website.


The website is a helpful resource that children can check out on their own time if they need more puberty information. It is an accurate, safe resource for kids.


KidsHealth.org Reproductive System Diagrams.
A few months into when I first started blogging, I posted a quick post with links to virtual reproductive systems from KidsHealth.org. Their diagrams match up almost perfectly with the diagrams from our puberty curriculum (Michigan Model's "The Wonder Years") making them easy to use in the classroom.  get a kick out of the fact that each part lights up when you click on it, and up pops a quick little summary of each body part. In addition to these diagrams, KidsHealth has a lot of useful information about the changes that occur in both males and females during puberty. With a plethora of information online about puberty and other human sexuality topics, parents can rest assured that the information on KidsHealth.org is medically accurate; it is written and reviewed by doctors. There is plenty of information on the website for students to review containing vocabulary, too.


You can view the male reproductive system diagram here and the accompanying information here. The female reproductive system diagram may be viewed here, while the accompanying information is here. Note that the male diagram contains a side angle view and a front angle view. The female diagram contains an internal view (front angle) as well as an external view. There is also an animation about the menstrual cycle, which is simple yet thorough in its explanation of menstruation.


Reproductive Systems "Mapping Lab"
After we learn about the various parts of the male and female reproductive systems, I have the students complete a "mapping lab" as a review during the next class. This idea was taken from the geography teacher across the hall, who uses this to help her students review countries, capitals, and physical features of the continents. Each group is given a blank copy of the reproductive system diagrams, a sheet protector, and a dry erase marker. Students are to label the reproductive systems using the dry erase marker, which easily erases off the sheet protector when needed. They are provided with a handout where they are to match the name of each body part with its function, too.


KidsHealth.org also has a parent site with useful information parents can use to talk to their children about the challenges of puberty. I don't provide parents with this information directly, but I do mention at open house that I know of some resources in case they feel in the dark about discussing puberty with their child. This feels weird to say to parents because in a lot of cases I'm young enough to be their son, but I put it out there anyway. Planned Parenthood has some great information on the topic, too.


To end on a lighter note, here's a video montage on YouTube containing clips of old-school puberty videos. We no longer use videos in our district at the middle school level, choosing instead to have a unit taught by the health teachers. When looking at these videos, it's hard not to laugh at how tongue-in-cheek they are, and I feel that puberty education deserves more than what those videos provide.


So, best of luck using these resources for your puberty endeavors! Here's a picture of me getting pumped up to teach puberty to my sixth graders:


Please e-mail me with any questions, comments, concerns, or other feedback. People generally don't comment here, but I do receive Tweets and e-mails every now and then. I'm hoping to get two more posts up before the holidays: one a lesson about YRBS data and the second about how my colleague and I are trying some literacy/vocabulary strategies in health education.

Monday, April 18, 2011

Nutrition Label Creator

Each trimester, I teach my sixth graders how to read food labels as part of our nutrition unit. Students usually are assigned to bring in a label from any food product, and then we engage in a lesson where we examine the food labels to determine the positive and negatives of each food item. This is also a great way to review the positive and negatives of nutrients that are listed on food labels.

I always try to have some extra food labels lying around. I've also noticed that although food labels are cut off of the packaging they come from, students are sometimes able to guess on the food item based on the look or feel of the packaging. In order to combat this, I looked for easy ways to create food labels online in order to promote a standard look among the food labels we use in class.

Many options exist, some of which cost money. A quick Google search provided me with a free, easy to use tool from the website Shop 'N Cook. Their Food Nutrition Facts Label Creator is easy to use and allows the user to print off each label as a PDF. Simply enter the nutrient information and the label creator will create a nutrition label. This may be a little time intensive at first, but once you figure out the interface, it's easy to whip up a few different labels.

While some people aren't as uptight as me about making sure everything looks the same, I find that for continuity purposes it makes sense to have a uniform look among food labels I use in class. Students are then able to examine the nutrition facts without any prior judgement as to what the food item may be, and are called on to use their nutrition knowledge (as opposed to any personal bias) when evaluating the nutrition information about a particular food item.

You can access the nutrition label creator at the Shop 'N Cook website by clicking here.

Monday, January 17, 2011

Video Viewing Activity: "Record, Elaborate, Extend"

I'm sure that I've mentioned somewhere in an earlier post that I'm not the biggest fan of using videos extensively in my classroom. I feel that there are too many other ways to effectively teach students health education that encourage them to be active, as opposed to passive, in their education. Unfortunately, in some districts health education is thrust upon teachers who are not trained or who have no interest in teaching health; this has led to health education being stereotyped as a class where videos are shown and nothing else really goes on. This is not to say that videos should be banned from the classroom! I do use short video clips whenever I can, to bring a different element to the classroom. In the May/June 2010 issue of the American Journal of Health Education, there's an article about using video clips in a health literacy program and their implication for providing context for classroom topics. I rarely show full length videos, but find that video clips can help stimulate discussion about topics, among other things.

In the situations where I do show actual videos, I don't want the students to sit there idly and fall asleep; nor do I want them to simply write down "facts" as they watch. After all, there is a point to the video! I want them to take specific information away from their viewing, and to expand upon this information later in class or during our unit. Recently during our seventh grade ATOD unit, I showed an eighteen minute video called, "Spit Tobacco Exposed." It's a little dated, from the era when green screens and flashy graphics were popular, but the content is accurate and is presented in a way that gets the attention of students. It also reviews some other information we will have already covered regarding tobacco and nicotine, so I'm able to get some review in while also presenting new content. The rest of the lesson builds off of this video.

Prior to the video, each student received a handout with a chart on it. The chart was entitled, "Record, Elaborate, and Extend." (Please see below for an embedded version of the chart) I came upon this idea from a colleague in the social studies department, who read about it in Educational Leadership. The article, entitled "Putting Gel Pen to Paper" is written by a seventh grade history teacher. The article's premise is that students can improve their writing skills while enhancing their understanding of course content.

Because the video I showed was brief (and only part of the lesson for the day) I didn't really need to focus too much on what I wanted the students to look for. But, if you look at the handout embedded below, you'll see I did highlight specific information I wanted the students to pick up on. Some students recognized the format and knew immediately what to do because they had seen this format elsewhere with other teachers. I model what to do using the Boston Red Sox as an example.

Below is a brief summary of the chart, with some information quoted from page 65 of the article "Putting Gel Pen to Paper." After the summary of each section, I've written what I specifically was looking for for this lesson.


Record (during video). "While they view the video, students jot down key points and significant ideas in the Record section of their viewing guide. Students should keep their points brief, recording only short phrases, because the process of transcribing should interfere as little as possible with the process of watching and listening." Record brief notes and short phrases on smokeless tobacco: what it is, its effects on the body, why people do it, negative health effects, etc.

Elaborate (during break or breaks). "The teacher pauses the video to allow students to process the information they have seen and heard. Students examine their recorded notes and write a specified number of full sentences in the Elaborate section of their viewing guide that describe what they have learned. Teachers may use sentence stems to help students start writing." Re-read your recorded notes. Write full sentences, making sense of the recorded notes and linking information together. Please note that because of the short length of this video, we did not pause at all. However, the video does provide an opportunity to pause for discussion towards the end; I just choose to wait until the video is over.

Extend (after the video). "The entire class discusses the elaborated points. Students can then respond to an open-ended question in the Extend section of their viewing guides, synthesizing what they have learned from the video." Use your notes to answer the following prompts: (1) Identify three ways smokeless tobacco could alter your life. (2) Justify the need for smokeless tobacco education in schools. For the next round of classes, I am going to change these questions.

Overall, I like using this format; it also allows students to practice note taking skills. They're not sitting back passively, focusing so much on the next question that they drown other information out, and they're not just writing down random facts and tidbits information that might not have relevance to the curriculum. It also ensures one hundred percent student participation. I have not yet had to modify this for any students in my classes, but the format can be made as specific as possible and is easy to modify.

It's also important to highlight that during the video, the students should only record brief phrases, so that they don't spend a lot of time away from paying attention to the video. It's fun to see the light bulbs go off when students link information together and make connections, too!

I've embedded an example of the chart I use below. Finally, here are two student examples from one of my seventh grade classes. These examples are not perfect (I had to clarify some items when I handed them back), but they are real-life student examples from a seventh grade class. If anything, they simply provide a visual of the "Record, Elaborate, Extend" format in action.

Student Sample #1:
Student Example #1


Student Sample #2:

Student Example #2


Here is the example chart:


As always, please feel free to e-mail me with any questions, comments, or concerns.

Article Citation: Yell, M.M. (2002). Putting gel pen to paper.Educational Leadership, 60(3), 63-66.


Disclaimer: I am not affiliated with HRM Video, the creators of "Spit Tobacco Exposed" nor am I affiliated with ASCD, the publishers of Educational Leadership. However, their publication is a GREAT resource that teachers can always take something from!

Thursday, January 6, 2011

LGBTQ Resources: Classroom Use

Recently the website Sex, Etc. updated their LGBTQ resources section of their website. I started drafting a post about Sex, Etc. this week but want to focus on how their updated LGBTQ section could be used in any health education classroom. Sex, Etc. is run by an orgnization out of Rutgers University called Answer. Answer believes that, "Sexuality should be understood, respected, and celebrated." Answer is a fantastic resource for teenagers, health educators, and others working with teenagers. The website is perfectly geared towards teenagers, with information that is accurate, up to date, and definitely important for their lives. Sexuality education is so much more than sex, sex, sex. Sex, Etc. highlights this important fact, and covers everything a comprehensive sexuality curriculum should cover.

The updated LGBTQ resources are intended for teenagers who are lesbian, gay, bisexual, transgender, or questioning and to help them understand who they are. The resources are also great for family members, friends, and other allies of LGBTQ teenagers. Let's face it, if you're a teacher there are going to be LGBTQ students in your classes. Middle school by itself is a tough experience, and the burden of trying to figure out who they are puts an additional burden on teenagers. The information contained below could very easily be used to help lessen that burden and also help teenagers become more comfortable with who they are.

Books. A list of over one hundred and fifty books are listed on the Sex, Etc. website. Ranging from fiction to nonfiction, and geared towards LGBTQ youth as well as allies, educators, and parents, this list has a little of something for everyone. As a high school track coach, one book about a gay track athlete has peaked my interest. In my classroom, I have a sign saying, "What Is Mr. Bartlett Reading?" with the cover of whatever book I'm reading scanned in color underneath. I collaborate with the middle school librarian, who provides me with young adult novels to read, with the hope that I can engage middle school students in discussions about reading. I've had some great discussions with kids about the books I'm reading (they've read some of them after I have!), and reading a book from this list could allow me to have important sexuality conversations that might not initially come up during class. Ideally, students would also realize that I am promoting discussion about these types of issues, while being accepting of students no matter what their sexual orientation happens to be. I would be more cautious about discussing this with sixth grade than I would with my eighth graders, however. Also, June is Gay and Lesbian Pride Month, and middle school librarians could have a display in their library focusing on LGBTQ literature geared towards youth, allies, and educators. This might be a hot button issue in many communities, but it's an issue people have to stop hiding from and start talking about!

FAQs & Stories. Stories from staff writers and contributors fill a list of stories highlighting a myriad of topics relating to LGBTQ youth: coming out to your parents, being harassed at school, even information about professional athletes dealing with harassment about their sexuality. Making students aware of these stories can help them understand that they are not alone and their experiences are normal. The FAQ section also provides a great starting points for students who are curious and seeking extra information on what they are feeling and going through. This information could be shared in a variety of classroom activities, depending on the content of the story. A post-reading classroom discussion about the stories would be crucial in order to make sure students understand the knowledge and attitudes you want them to learn.

Web Sites and Hotlines. Sex, Etc. provides teenagers with twenty two websites and nine hotlines, such as PFLAG, The Trevor Project, and outLoud Radio. Teenagers can connect with students going through similar experiences, find support, and learn something from all of the listed web sites and hotlines. These organizations are easily made available to all students through a classroom display (it can be as small as one piece of paper on a bulletin board, or a larger display) or even through a classroom project asking students to research the different organizations and what they offer to teenagers.

Forums. The Sex, Etc. forums offer a way for teenagers to connect with others through discussion. It appears that the LGBTQ specific forums don't get too much activity compared to the other sections, but hopefully with the attention around these new resources activity will increase! The other forums are packed with information, with questions answered by an on-site expert. This is a great resource for teenagers who don't want to ask their parents or doctors the "tough" questions. Many teachers would not be able to share the content of these forums in their own classroom due to school policies or parental issues (which is a whole other topic!) but the forums are definitely a "go-to" outside of school resource.

As of right now, my curriculum relating to sexuality includes puberty in sixth grade and HIV/AIDS and other STDs in eighth grade. If I had my way, I would be able to teach everything! I'm hoping to work to improve that in my district, but because I can't right now, Sex, Etc. is a resource that I am comfortable passing along to students if they so inquire when I am teaching the units I mentioned above. So many websites on the Internet contain information that is false, and Sex, Etc. is the type of websites teenagers need to see!

All in all, the LGBTC section of Sex, Etc. provides valuable, must-see information for teenagers, educators, parents, and allies. I can only imagine what it would have been like if teenagers in my parent's generation would have had access to resources like these. It is vital to spread this information so we can prevent more tragedies, promote tolerance and acceptance, and finally be able to accept everyone, no matter what their sexual orientation is, simply for who they are.

As always, please e-mail me with any questions, comments, or concerns.

Monday, November 22, 2010

Analyzing Alcohol Advertisements: Resources for Educators

NOTE: I am in no way affiliated with Frank W. Baker or The Media Literacy Clearinghouse. I write this on my own free will with the purpose of passing on an incredible resources to other teachers!

Frank W. Baker is a media literacy expert who runs the Media Literacy Clearinghouse.  The clearinghouse contains information regarding media literacy and its application to a variety of topics, including health topics such as alcohol, body image, food, sex, and tobacco. Each section contains downloadable articles, lesson plans, sample advertisements, and links for more information that every health educator should check out! I frequently use his links to alcohol advertisements for a carousel activity (I should post about that soon...) with my seventh graders. Mr. Baker has all angles covered, and his website is very comprehensive with that information is provides.

Baker also covers additional topics, such as bias, media art, and propaganda, to name a few. This makes it easy for teachers of separate subjects to plan cross-curricular activities relating to their course content with colleagues. His website is a valuable resource for any health educator who wants to tie media literacy into their various units.  Occasionally, some of the links will be broken or outdated; a Google search usually fixes this. It would be relatively easy for teachers to design webquests featuring The Media Literacy Clearinghouse, which could easily work out to the higher level, critical thinking skills that are vital for students to learn. So, please check out The Media Literacy Clearinghouse!

As always, please feel free to e-mail me with any questions, comments, or concerns.

Friday, August 27, 2010

MyPyramid Blast Off! Review Game

MyPyramid is the current food pyramid that is used in our sixth grade nutrition unit. I do try to incorporate other food pyramids if we have time (the Healthy Eating Pyramid and the Mediterranean Food Pyramid are two) for comparison purposes, but time is usually not a luxury afforded to a sixth grade classroom!

The USDA created MyPyramid in 2005 as an update to the old food guide pyramid that I learned about in middle school. When it was created there was a fair amount of criticism which led to the creation of other food pyramids. My sixth graders come into class with basic knowledge of MyPyramid from their fifth grade health class in elementary school. So, I go into more detail about how they can individualize their eating habits using MyPyramid, among other topics relating to nutrition. I usually begin with a review so I can make adjustments in case some students have more knowledge than others.

The MyPyramid Blast Off! game is a great review for students relating to the food groups, serving sizes, and incorporating moderation and variety into their diet. Students must fuel their rocket ship with food from all food groups and physical activity to reach Planet Power. I make this activity interactive by allowing students to come up and use the Smart Board to help play the game. When I use it this year I'm going to try to have some sort of companion activity so students don't become bored or overly excited. You do need Flash 7 or greater to play the game. Click here to launch the game and try it out!

Sunday, August 22, 2010

Staying Updated: Google Reader & Google Fast Flip


NOTE: I am not affiliated with Google or the blog Free Technology for Teachers in any way, shape, or form. I simply use a lot of Google Products and read Free Technology for Teachers for great information.

I strive to remain up-to-date on health topics that are making headlines in the news. I often incorporate current events into my health classes whenever I can, in order to bring a little "real world" information into my classroom. I use Google Reader as an RSS aggregator to keep myself informed of information that is being published from a variety of resources: newspapers, blogs, government websites, etc. I have multiple sections, including one for "education" and another for "health" related information. I browse through the feeds as soon as I get into my classroom each morning to see if there is anything I can use during the day.

For those who don't know (Hi, Mom!) an RSS aggregator is basically one-stop shopping for customizable news information. News from a variety of sources (websites, blogs, etc) is easily categorized based on how I want to view it. I have thirteen different feeds for education and health, which is definitely enough information for what I am trying to do. The one downfall of not including more feeds is that there is in increased possibility that I will miss a story I might be able to use in class. However, adding additional feeds from all over the country becomes quite cumbersome and there would simply be too many stories for me to sort through. I don't read each and every one now; I scan and read if I am interested. My point is that there becomes a point where there would be an information overload and where time starts being wasted.

Enter Google Fast Flip. I found out about Google Fast Flip (and a lot of other things!) by reading the excellent blog Free Technology for Teachers by Richard Byrne. Google Fast Flip provides news articles in a visual display that the user can scroll through for a quick scan of what's popular in the news. You can select different categories, such as Sports or Health. Fast Flip shows news stories from all over the country, covering local and national news, which allows me to have a greater depth of information without cluttering my RSS feeds. Fast Flip gives me the opportunity to read news from sources I would otherwise not read.

I selected the "Health" section and was immediately able to skim articles from major news outlets and websites. If an article interested me, I clicked on it to read it in depth. In a time where everyone seems to need more than twenty four hours in a day, Google Fast Flip is a great way for me to supplement the information I obtain through RSS. I can easily access this website in class and show my students how health is always in the news, and maybe select and article or two to talk about. I can have students use Fast Flip for their "Health in The News" assignments, and the variety of sources can expose them to different writing styles and opinions. Students could also compare and contrast assignments from different newspapers. Try it out for a quick visualization of what's popular in the news!

Friday, August 20, 2010

Infographics: Nutrition Related (From A Great Blog!)

Using infographics is a great way to present information or data in a unique, visual way. Instead of presenting information using many numbers or a block of text, an infograph can convey information in way that can be quickly understood and absorbed. They are also great in order to emphasize certain points from a lesson or to allow content to "hit home" when students see it visually. They're also great for visual learners.

While scrolling through my Google Reader account, I came upon an entry from one of my favorite blogs, Free Technology for Teachers. If you've read my posts before, I've linked this blog on a few occasions. You MUST visit this website!


Richard Byrne, who created the blog, posted a few links with infographics relating to obesity and eating out. I checked a few of them out and I'll definitely be using them during our nutrition units this school year. These graphics will allow me to expand upon content we're covering and I'll be tying in some critical thinking skills with them, too. There is no point in re-posting the links he created, so below is a link to his blog. Plus, I want you to check out his website! I have another post about something I'm using after I read about it on his blog, too.

Free Technology for Teachers: Infographics on Eating out and Obesity.

Sunday, June 13, 2010

Brainstorming Tool: bubbl.us

A new unit in our eighth grade curriculum this year focuses on gambling addiction. Based on our version of the Youth Risk Behavior Survey, we know that a lot of our middle school students do not gamble; it is still an important topic to discuss as the potential to get into a lot of trouble (financially, socially, legally etc) is great. I also use it as a segue into the addiction information they will talk about next year at the high school.

To begin the unit this time around, I conducted a brainstorming activity with my eighth grade classes. Using a website I just found out about, the students brainstormed everything they know about gambling, based on specific categories I provided.

The website is called bubbl.us, and I found out about it through a post on the excellent blog Free Technology for Teachers. (If you are a teacher, you NEED to follow this blog!) On bubbl.us, you can noodle around before you actually register to see if the site is something you could use. Be sure to check out the features example provided on the homepage for additional information. You'll learn a lot just by using the interface, and can embed and export files created on bubbl.us. If you have Smartboard capabilities, you could have students type using the on-screen keyboard (or do so yourself); although I have a Smartboard in my classroom, I decided to key stuff in from the computer my first time using this lesson.

I'm certain that this website could be greatly used in some of our other units, such as our sexual harassment unit. Creating information in a visual way is a handy way for students who think that way, and the chart is something we can refer back to throughout our unit. I could also use this as an informal pre-test/post-test of student knowledge or as another form of formative assessment (link). In this case, this tool allowed me to gauge the classroom knowledge about this topic. In the future, I plan on printing these brainstorms out to refer back to over the course of a unit. I might also try an ongoing segment where our classes link each unit together, noting similarities and common themes.

Here is an example from my first period, eighth grade class; you can browse around:


As always, feel free to e-mail me with any questions, comments, or concerns.
Related Posts Plugin for WordPress, Blogger...